Required Hardware
- Raspberry Pi Zero W ($10 – https://www.adafruit.com/product/3400)
- Power adapter (5 volt, 2.5 amp) – I bought mine on EBay for $3.82
- Optional: PI Zero W Case ($6 – https://www.adafruit.com/product/3446)
MicroSD Card, I’m using a cheap class 10 8GB card, which should be plenty if this Pi will only be used for PiHole.
Required Software
- Win32DiskImager – Use this to write our OS image to MicroSD
- Putty – Use this to connect via SSH into Pi
- Notepad++
Preparing the MicroSD
- Download the OS image, Raspbian Stretch Lite, from here:
https://www.raspberrypi.org/downloads/raspbian/ - Extract the .IMG file from the ZIP to a convenient location.
- Prepare your SD card for writing. I like to clean the disk before proceeding to ensure old partitions and such are wiped out:
- Write the .IMG file to disk with Win32DiskImager or similar. Say “Yes” to warning prompt.
- When this finishes, you’ll probably get at least one error about unreadable file system. Don’t worry about it. Do not eject the MicroSD card yet. You should have a new drive listed as “Boot” now.
Enabling SSH and Provisioning Wireless Connectivity
One of the things I love about the Pi is how easy it is to turn it into a headless system. To do this, we need to specify our wireless network credentials ahead of time, as well as enable SSH.
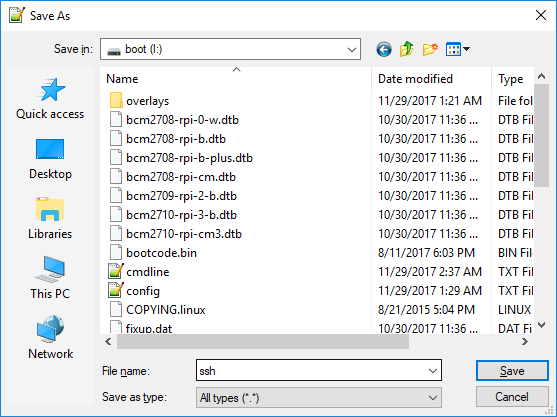
SSH is now, by default, disabled in Raspbian Stretch Lite out of the box. Enabling it is as simple as literally creating a blank text file in the root of the boot partition named “ssh”. Your save menu in Notepad++ should look like this:
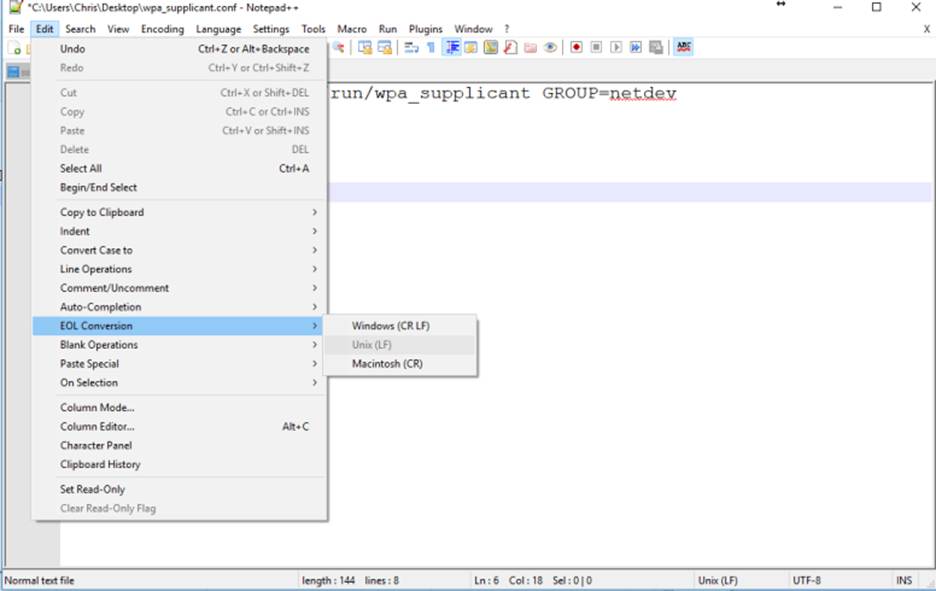
Similarly, to provision network connection, we’ll create a file in the same partition named “wpa_supplicant.conf” containing the following:
ctrl_interface=DIR=/var/run/wpa_supplicant GROUP=netdev
update_config=1
network={
ssid="Network Name”
psk="Password"
scan_ssid=1
}
You’ll need to set EOL Conversion to Unix to make sure the file is parsed correctly. Something to do with line break formatting.
Your save menu should look like this:
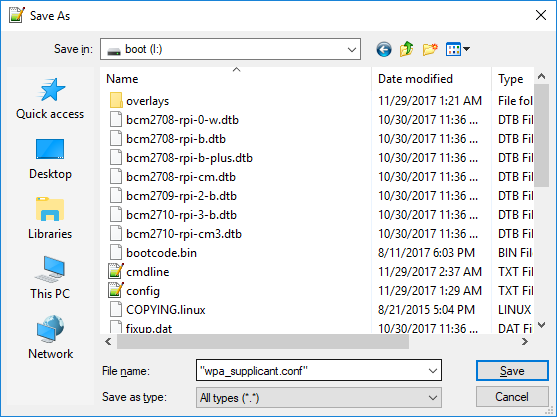
Verify both wpa_supplicant.conf and SSH are present on your boot partition, then eject the MicroSD card and install in the Pi Zero W.
Moving to the Pi…
Power up the Pi Zero W, ensure you connect the MicroUSB cable to the port labeled “PWR IN” instead of “USB” – you should see a small green LED flickering.
Our Pi Zero W is now booting, enabling SSH access, and connecting to the wireless network we specified in the file above. We need to know the IP address that DHCP assigns to it. There are a few ways to do this, but it’s simplest to just login to your router configuration (assuming your DHCP is hosted there) and look for a device named Raspberry Pi.
I login to my Ubiquiti EdgeRouter X and go to my DHCP area. Essentially, you’re looking for your DHCP client list. This varies based on router manufacturer. I used to have an Apple Airport Extreme and it didn’t even allow you to view your own DHCP client list (laughable). In that case, you could use a software tool like N-Map to scan your network and identify your Pi.
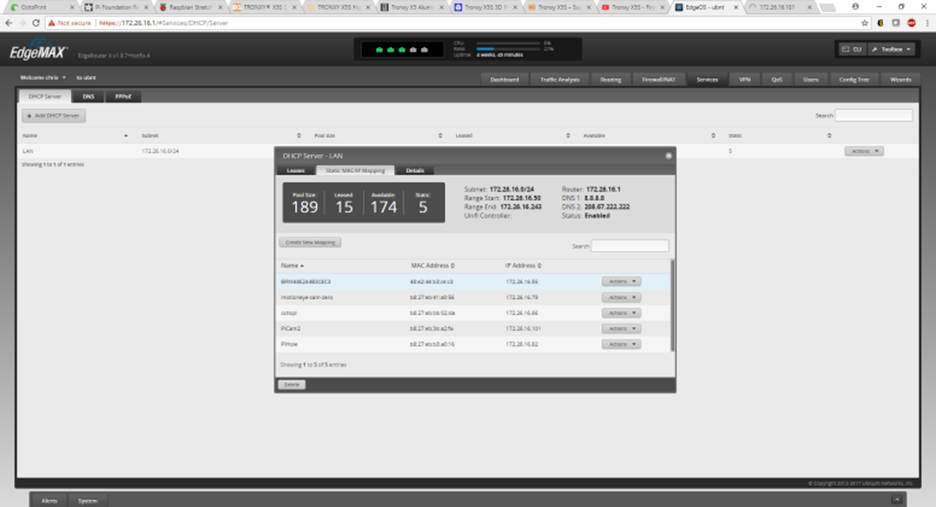
I went ahead and reserved the IP .82 for the PiHole. You should do something similar. Best practice would be to move the Pi outside of my DHCP client scope and configure it (client side) to a static IP address.
Now, armed with our Pi’s IP address, we’ll open Putty and connect to it via SSH:
You may get a security warning here, click Yes to proceed. If you get a “login as:” screen, you’re golden.
The default login credentials are: User – Pi / Password – Raspberry
You can (and should) change the “Pi” user’s password by running “passwd”
Run “sudo raspi-config” and choose Update, let the utility update itself.
Let’s also get the latest updates for Raspbian by running:
sudo apt-get update
sudo apt-get dist-upgrade
Now, finally, we can install PiHole by running:
curl -sSL https://install.pi-hole.net | bashAfter some time, you’ll be greeted with this screen:
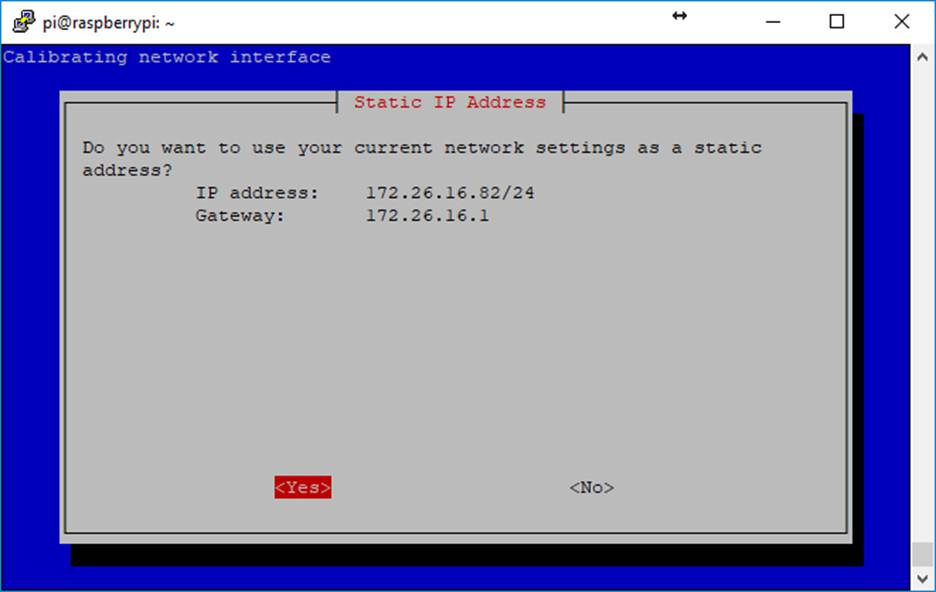
Follow the prompts. I use OpenDNS for upstream provider. IPv4 is default and most likely what you’ll want to operate on. Since I reserved 172.26.16.82 in DHCP, I will tell it to keep its current address and configure itself with that as a static address.
Leave the rest of the values as default (logging, web interface)
At the end of the install, make sure to note the default login password:
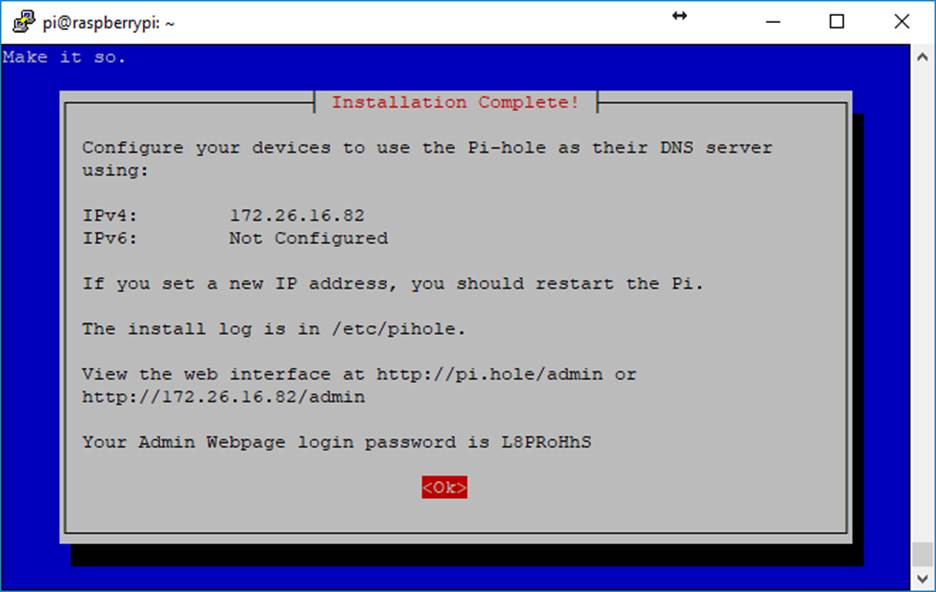
You can close putty and your SSH session now. Hop over to your browser and visit your PiHole’s web interface. Mine is http://172.26.16.82/admin/

If you forgot to save the default password, you can change it by opening an SSH session and running “pihole -a -p”.
There are a lot of areas to explore in the web interface, but at this point — you have a functional PiHole DNS ad-blocker with a basic list of 125,000 or so blacklisted domains.
You can put this into production now by configuring your DHCP server to assign clients to the PiHole’s address for DNS resolution.
This will differ from router to router, here’s how I do it on Ubiquiti hardware.. notice that I am using PiHole as the first DNS preference, and OpenDNS’s IP directly for some redundancy should my spiffy new $10 network appliance fail.
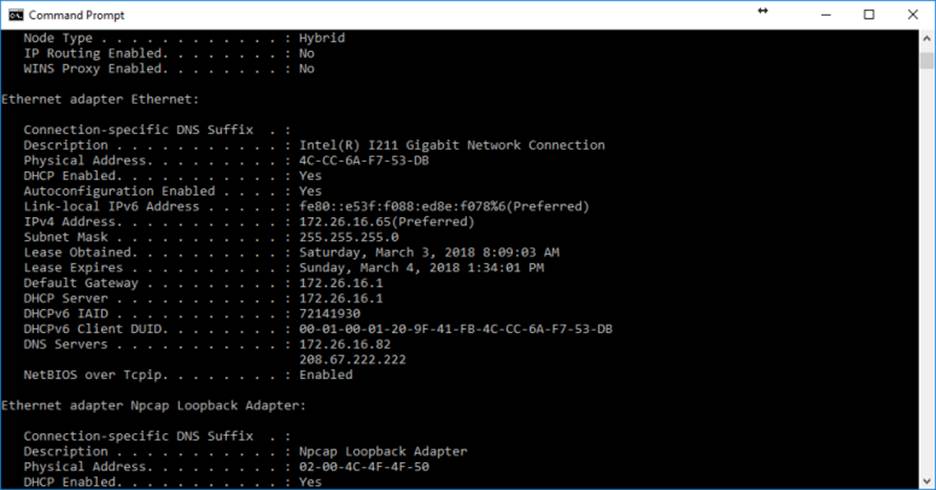
On a client PC, you will likely have to wait for the lease to expire or DHCP to notify the clients of the DNS configuration change. I haven’t tested how long this takes. You can trigger a refresh with “ipconfig /renew” on a client PC, then “ipconfig /all” should show your PiHole’s IP in the first DNS entry afterward.
That’s it. All of your clients will begin sending DNS requests through the PiHole now and the PiHole will actively block requests to known blacklisted addresses. There are various sites online to get additional lists to add to your PiHole, but the basic list does a decent enough job to get you started.